
Your web app is live. Now you want to replace the URL supplied by your hosting service with your own app.example.com.
Buying a domain is only one part of that work. You also register the hostname with your app's host, point DNS to the right destination, and prepare a certificate that allows HTTPS connections for that name.
Moving between settings screens can make these three tasks seem like one. This guide separates their roles, then uses KamuiDash to explain what to enter and what to check afterward. It assumes your app already works at its default URL and you can edit the DNS settings for a domain you control.
The screenshots are demonstration screens in Japanese. Domain names and validation values are samples; they do not show a real domain registration, certificate issuance, or successful connection. The interface labels were checked against the UI available on November 5, 2026.
In this article
- Separate the hostname, DNS, and HTTPS
- Start with app.example.com
- 1. Register the hostname with your app's host
- 2. Configure the CNAME and any displayed validation records
- 3. Check DNS and SSL, then open the app
- Troubleshoot DNS, the certificate, and the app in that order
- Finish by testing your usual actions at your own URL
Separate the hostname, DNS, and HTTPS
In https://app.example.com/notes, app.example.com is the hostname and /notes is a path within the app. Registering a domain lets you manage names beneath it. Connecting a name to an app is a separate step.
| Setting | What it determines | Where you usually configure it |
|---|---|---|
| App's custom domain | Which app receives requests for this hostname | Your app's hosting service |
| DNS records | How to look up the hostname's connection destination | The service managing the domain's DNS |
| TLS certificate, sometimes labeled SSL | Whether HTTPS connections can be served for this hostname | The host's certificate or custom-domain settings |
When one hosting platform serves multiple apps, a connection destination alone does not identify the app. Registering a custom domain associates that hostname with your app. Render likewise documents a sequence of adding the domain to the service, configuring DNS, and verifying it. Render: Custom Domains
The company where you bought the domain may not be the service managing its DNS. If you moved DNS management elsewhere, edit the records at that service. Check both where you registered the domain and where its DNS is currently managed.
Start with app.example.com
This example uses app.example.com, a subdomain of a domain you already own, example.com.
The name example.com itself is also called the root or apex domain. Its configuration depends on the combination of your hosting service and DNS provider. Cloudflare, for example, offers CNAME flattening to support a CNAME configuration at the apex. Starting with a subdomain makes the basic process easier to follow; consult both providers' instructions when using the apex. Cloudflare: CNAME flattening
Before connecting the name, check whether it already serves a website or another service. Adding a new app record does not require changing unrelated hostnames or email records. When moving a hostname that is already in use, record its existing settings and how to restore them before switching.
Domain registration and renewal fees are separate from any custom-domain charges imposed by the app's host. KamuiDash also bills custom domains separately, so check its custom-domain documentation and pricing page before configuring one.
1. Register the hostname with your app's host
In KamuiDash, open the app's detail page and choose the custom-domain setup button, labeled 「カスタムドメインを設定」 in the Japanese interface. Enter the hostname you want to use:
app.example.com
Leave out https:// and paths such as /notes. Register the name that should connect to the app, rather than an entire URL.
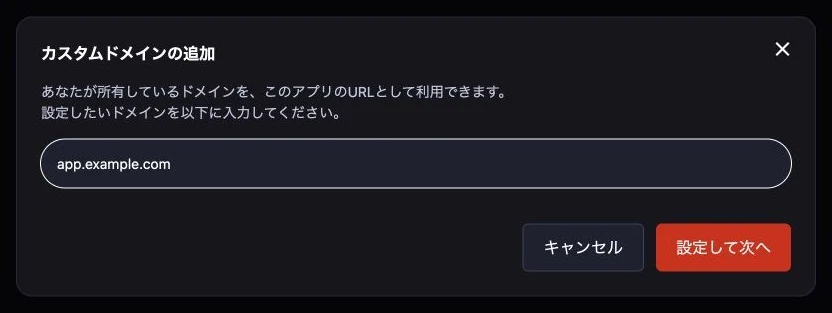
After registration, read the DNS instructions. For a domain already configured, open 「カスタムドメインを管理」 (manage custom domain). KamuiDash supports one custom domain per app, so check the existing configuration before replacing it. KamuiDash: Custom Domains
2. Configure the CNAME and any displayed validation records
On the DNS side, first configure the hostname's connection destination. A CNAME record refers to another hostname; an A record specifies an IPv4 address, while an AAAA record specifies an IPv6 address. Use the record type and value specified by your host. Cloudflare: DNS record types
For KamuiDash, use the CNAME destination displayed in the custom-domain settings. Copy that value instead of guessing that the app's default URL is the correct target.
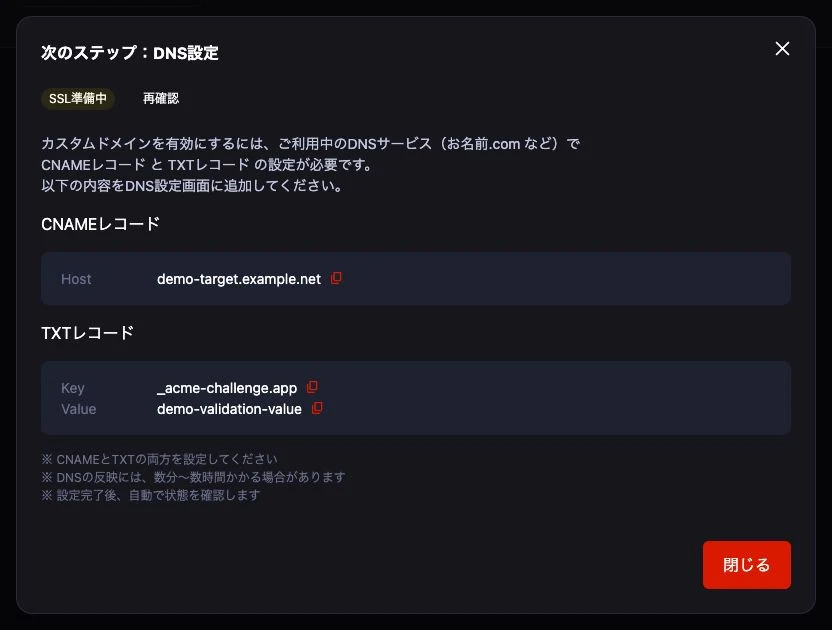
Here is how the demo maps to DNS settings for example.com. These are explanatory sample values; do not register them as written.
| Type | Name or hostname field | Value or destination field |
|---|---|---|
| CNAME | app or app.example.com |
The displayed destination; demo-target.example.net in this example |
| TXT, if displayed | The displayed Key; _acme-challenge.app in this example |
The displayed Value; demo-validation-value in this example |
Some DNS services expect only app in the name field, while others accept app.example.com. Check that the saved record's full name is app.example.com. A screen that appends the zone name automatically may duplicate the suffix if you enter the full name.
app.Do not add https:// or a path to a CNAME value. A CNAME is a DNS alias; creating it does not itself redirect the browser to a different URL. Cloudflare: CNAME records
Check the purpose and value of each TXT record
Certificate issuance requires validation that you control the domain. One method is to publish a specified TXT record in DNS. Other validation methods exist, so a TXT record is not mandatory for every hosting service. Let's Encrypt: Challenge Types
The current KamuiDash UI may display certificate-validation TXT records while SSL is being prepared. Those instructions may no longer appear after SSL becomes active. A separate TXT record labeled 「TXTレコード(所有権確認)」 is for ownership verification; include it when displayed. Check the records currently shown rather than assuming there must always be exactly one CNAME and one TXT.
If multiple TXT values are requested for the same name, register each as a separate value. Do not concatenate them into one string. Cloudflare's TXT certificate-validation documentation describes a case requiring multiple validation records.
If Cloudflare manages your DNS, also follow your host's instructions about proxy status. DNS-only records and records that proxy traffic through Cloudflare behave differently. Cloudflare: Proxy status
3. Check DNS and SSL, then open the app
Saving a DNS record does not mean every resolver immediately returns the same answer. DNS responses can be cached, and TTL helps determine how long they are kept. Rather than assuming the app will work a fixed number of minutes after saving, check the records and the answers returned. Cloudflare: TTL
Recheck the status in KamuiDash and look for 「SSL有効」 (SSL active).
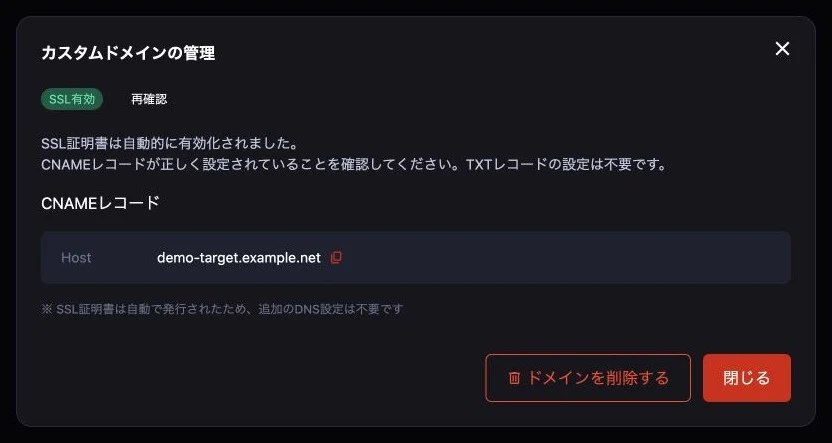
Do not stop at the SSL status. Open https://app.example.com in a browser and confirm that the expected app appears. Test the pages and APIs you actually use, as well as the home page.
For apps with sign-in or external API integrations, check the effects of changing the URL. Examples include callback URLs registered with an authentication service, requests to an API on another origin, and a cookie's Domain setting. Even when DNS and HTTPS work, features that assume the previous URL may need adjustment.
Also check how HTTP requests are handled. The following command prints response headers. Replace app.example.com with your hostname.
curl -sS -D - -o /dev/null http://app.example.com/
If you expect a redirect to HTTPS, inspect the response status and Location header. HTTPS availability and automatic HTTP-to-HTTPS redirection are separate behaviors. Verify the behavior of your host and app configuration.
Troubleshoot DNS, the certificate, and the app in that order
The name cannot be found, or it connects somewhere else
Confirm that the service where you edited the records currently manages the domain's DNS. Then inspect the record name and value. Check for a duplicated suffix, an incorrectly copied target, or conflicting records left under the same name.
If dig is available in your terminal, you can inspect DNS answers with:
dig app.example.com CNAME +short
dig app.example.com A +short
dig _acme-challenge.app.example.com TXT +short
Replace the TXT lookup name with the one shown in your settings. Some configurations return a CNAME target; others, including proxying or CNAME flattening, can return A records instead. An empty CNAME answer alone does not prove the configuration failed. Interpret the response according to the host and DNS provider's setup. Cloudflare: CNAME flattening
Without dig, you can still check the saved name and value in the DNS dashboard. Verify where you entered the records and what you entered before installing additional tools.
There is a certificate warning, or SSL preparation continues
Check the registered hostname, the DNS destination, and any required validation records. If SSL preparation continues, look at whether the requested validation has completed. Compare the browser's error with the host's status; do not ignore a certificate warning and treat publication as complete.
If KamuiDash shows 「要対応」 (needs attention) or 「確認できません」 (cannot verify), inspect the current records and error before repeatedly deleting and registering the domain again. Distinguish a state that needs time from one that needs a configuration correction.
HTTPS works, but you receive a 404 or 502
Check the app associated with the custom domain and the app's current state. If the default URL returns the same error, that is a clue to investigate startup or application routing. If only the custom domain fails, check the hostname registration and any allowed-host settings in the app.
A 404 or 502 can originate from the hosting platform or the application. Receiving an HTTP error alone does not establish that everything after DNS is correct. Use the response content and logs to identify what returned it.
Finish by testing your usual actions at your own URL
Connecting a custom domain means registering the hostname with the host, configuring its DNS destination and required validation records, and checking HTTPS and the app's response.
Finally, confirm that the expected app opens at your hostname over https://, the required pages and sign-in work, and HTTP behaves as intended. Separating these checks helps you choose the next thing to investigate instead of stopping at “it probably needs more time.”
If you have not published the app itself, start with automatic deployment when you push to GitHub. If you are still choosing a host, see where to deploy a personal web app.
KamuiDash is a PaaS for deploying web apps from GitHub.